German Tutorials. Basic Phrases, Vocabulary and Grammar.
Mar 31
German Tutorials. Basic Phrases, Vocabulary and Grammar.

Frecuentemente se tienen dificultades para importar bases de datos MySQL que tengan gran tamaño dentro del proceso de administración de una página web, y resulta muy típíco en la administración de sitios o blogs meidante WordPress. Puede suceder que en algún momento haya que mover las bases de datos de un servidor a otro (p.e. en caso de migración de una página web) y que el nuevo imponga un límite en el tamaño máximo del archivo permitido para la BD. En estos casos, si se intenta cargar bases de datos por encima del límite máximo mediante phpMyAdmin recibiremos un mensaje de error por exceso tras el intento de importación.
Cada servidor de alojamiento permite un tamaño máximo de las bases de datos MySQL que se pueden importar. Desde la opción Importar de phpMyAdmin se puede conocer este límite.

Para salvar esta dificultad hay diferentes herramientas que permiten restaurar de forma sencilla grandes bases de datos MySQL cuando no se puede realizar la importación mediante phpMyAdmin u otros medios debido a los límites impuestos por un servidor web respecto a su tamaño o al tiempo de ejecución. Se pueden diferenciar dos tipos:
PROVEEDORES DE ALOJAMIENTO WEB GRATUITO DE GRAN CAPACIDAD y SIN ANUNCIOS
[Free Web Hosting – no Adds]
Como complemento al post anterior en el que se analizan las características de los servicios de alojamiento web gratuitos, se describen aquí algunos de los servicios de alojamiento gratuito de gran gran capacidad (free web hosting de al menos 2GB) que no introducen sus anuncioscon en tu página web (no-adds). Se muestran sus características principales y también sus limitaciones, más o menos ocultas, que restringen su uso y que pueden ser relevantes a la hora de elegir un proveedor u otro de hospedaje gratuito en función de la exigencia y tus necesidades de alojamiento web. Se trata de algunos de los que considero mejores y más interesantes: Continue reading
 Hay muchos proveedores de alojamiento de páginas web (web hosting) que anuncian planes de alojamiento gratuitos. De ellos, hay algunos que dicen ofrecer espacio de almacenamiento ilimitado. En la práctica, muchos de los que dicen ofrecer espacio ilimitado (incluso de pago) proporcionan en realidad 5 o 10 GB. Los proveedores que proporcionan espacio web gratuito a partir de 2GB puede considerarse ya free web hosting de alta capacidad.
FACTORES LIMITATIVOS DEL ESPACIO WEB DISPONIBLE
Aunque el alojamiento que suministran tiene coste cero para el cliente, hay en ellos lo que podríamos llamar una “letra pequeña” que no publicitan expresamente pero que limita su capacidad real de alojar recursos. Más allá de sus disclaimers concretos relativos al tipo de contenido prohibido y los términos o condiciones del servicio a los que se puede acceder desde sus páginas, varias de las múltiples características técnicas del alojamiento suelen estar restringidas para limitar la capacidad real y/o para evitar el abuso.
 1.- El primer factor limitante a considerar es la cantidad de inodos permitido. La mayor parte de hostings gratutitos de alta capacidad suelen limitar su número a 20.000. Teniendo en cuenta que hay una relación aproximada entre número de inodos y número de archivos, en la práctica, la limitación de inodos está limitando el número de archvios total que puede alojar el sitio. Una vez superado dicho número, no será posible subir al servidor más archivos. Los planes de alojamiento de pago aumentan considerablemente el número límite de inodos permitidos.
Hola a tod@s,
Un año de movimientos alternativos se merece una felicitación alternativa.
No permitamos que nos amordacen.
Feliz Navidad y, como siempre, mis mejores deseos para el año entrante.
Pp.

Estructura de la oración en el idioma alemán – Esquema (pdf)
YUMI (Your Universal Multiboot Installer) is a Windows based program that creates and prepares USB pendrives to boot multiple operating systems, antivirus utilities, disc cloning tools, diagnostics, and many other live versions (Multiple USB boot creator -Multiboot –). It is useful to carry multiple bootaable operating systems or applications in a single device. In the same pendrive can have Ubuntu, Kaspersky Rescue Disk or Windows OSs, if you have the ISO image. If you do not, YUMI can help you to downlad in some cases.

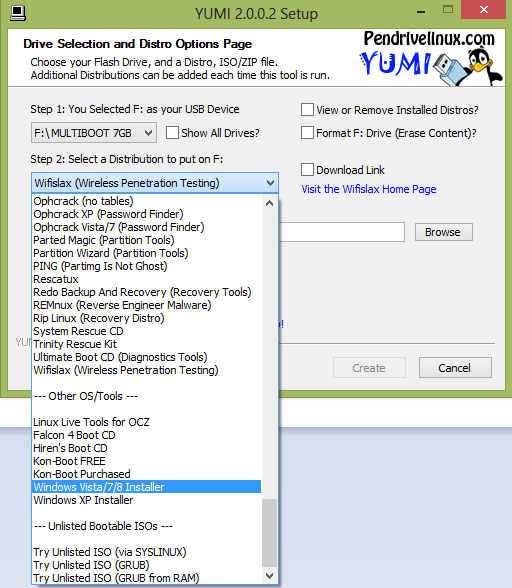
Regarding operation, YUMI is very easy and intuitive to use: choose the unit of your pendrive, the distribution or LiveCD to copy and then its file. A click on Create and YUMI will convert your removable memory in a store of distributions with its own boot menu. It uses syslinux to boot distributions stored on the USB device and uses GRUB to boot multiple ISOs files from USB, if necessary.
Except for some distributions (as, for example, Windows Vista/7/8/8.1 releases), all files are stored orderly in the folder ‘multiboot’ to make a USB Multiboot well organized. The installed distributions can be also uninstalled from the same program.
NATURE OF THE PROBLEM
YUMI does not allow to include more than one installation disk/ISO simultaneously of the latest versions of Windows. You can create from the selection menu of distributions, and include at the same time in a multiboot USB, a boot and installation disk forl Windows XP with another one of any of the later versions (Vista/7/8/8.1). The problem arises when you want to include in the same USB device two or more installation discs/ ISOs of Windows Vista, Windows 7 or Windows 8 / 8.1.
Although apparently the selection menu gives the impression that it could create additional and consecutive multiple bootable installation disks of various versions of Microsoft OS (Windows Vista/7/8 Installer), in practice, you can only create an installation disk for one of the following: Windows Vista, Windows 7, Windows 8 / 8.1.
As noted above, not all distributions are stored separately and independently within the ‘multiboot’ folder. For Windows Vista/7/8/8.1, YUMI unpacks in the root of the pendrive. Therefore, installing a second Windows crushes on the previous and generates inconsistencies in the booting process what leads to a not working installation. However, any of them is compatible with Windows XP installer (Windows XP Installer) created by YUMI. In fact, the menu appears as a distinct option selection.
PROCEDURE FOR CREATING A “MULTI-WINDOWS” USB ON YUMI
To have several installers of Windows Vista/7/8/8.1 on a ‘multi–Windows’ USB memory within the YUMI environment we have to add a number of menu files configured to boot the different Windows installers independently.
» The tools needed:
– YUMI.
– FiraDisk (required for windows).
– Any one of the distributions that YUMI installs form its dropdown menu, eg Ultimate Boot CD, for creating the initial YUMI enviroment.
– The ISO images of the installation files/CDs for the Microsoft OSs that we want to load in the pendrive.
● Format the flash drive and install with YUMI the selected distribution (eg. UBCD). Once done, you can, if you want, delete it in YUMI uninstall mode.
● Copy the image iso. installation files of Windows versions that you want to add in the folder ‘/multiboot/ISOS‘.
● In the ‘multiboot‘ folder of the pendrive, open/edit the ‘syslinux.cfg‘ file with any text editor. Add the following and save:
label System Tools
menu label Windows Installation ISOs ->
MENU INDENT 1
kernel vesamenu.c32
APPEND /multiboot/menu/windows.cfg
● Now, enter in the ‘menu‘ folder and create a file ‘windows.cfg‘. Add the following lines and save:
# Menu Entry Created by Lance http://www.pendrivelinux.com for YUMI
default vesamenu.c32
prompt 0
menu title System Tools
menu background yumi.png
MENU TABMSG http://www.pendrivelinux.com
MENU WIDTH 72
MENU MARGIN 10
MENU VSHIFT 3
MENU HSHIFT 6
MENU ROWS 15
MENU TABMSGROW 20
MENU TIMEOUTROW 22
menu color title 1;36;44 #66A0FF #00000000 none
menu color hotsel 30;47 #C00000 #DDDDDDDD
menu color sel 30;47 #000000 #FFFFFFFF
menu color border 30;44 #D00000 #00000000 std
menu color scrollbar 30;44 #DDDDDDDD #00000000 none

label <-- Back to Main Menu
kernel vesamenu.c32
append /multiboot/syslinux.cfg
MENU SEPARATOR

label Windows XP Installation ISO
menu label Windows XP Installation ISO
MENU INDENT 1
KERNEL /multiboot/grub.exe
APPEND --config-file=/multiboot/menu/windowsXP.lst

label Windows 7 Installation ISO
menu label Windows 7 Installation ISO
MENU INDENT 1
KERNEL /multiboot/grub.exe
APPEND --config-file=/multiboot/menu/windows7.lst

label Windows 8 x86 Installation ISO
menu label Windows 8 x86 Installation ISO
MENU INDENT 1
KERNEL /multiboot/grub.exe
APPEND --config-file=/multiboot/menu/windows8x86.lst

label Windows 8 x64 Installation ISO
menu label Windows 8 x64 Installation ISO
MENU INDENT 1
KERNEL /multiboot/grub.exe
APPEND --config-file=/multiboot/menu/windows8x64.lst
Note: To do this just create a .txt file, add the contents and rename the file. Do not forget to leave a space between each block of text.
● Also in the ‘menu‘ folder, create .lst files for each of the operating systems that is intended to integrate into the pendrive. As examples:
– For Windows XP, create ‘windowsXP.lst‘, add the following content and save:
default 0
timeout=0
title Windows XP x86 ISO
map --mem (md)0x800+4 (99)
map /multiboot/ISOs/WINXP_X86.ISO (0xff)
map (hd0) (hd1)
map (hd1) (hd0)
map --hook
write (99) [FiraDisk]\nStartOptions=cdrom,vmem=find:/multiboot/ISOs/WINXP_X86.ISO;\n\0
chainloader (0xff)/BOOTMGR || chainloader (0xff)
Similarly, you could create another file for the x64 version.
– For Windows 7, we create ‘windows7.lst‘:
default 0
debug off
set MYISO=WIN7_X86-X64.iso
dd if=()/firadisk/au.xml of=()/AutoUnattend.xml
dd if=()/firadisk/spaces.txt of=()/firadisk/ISONAME.CMD
write ()/firadisk/ISONAME.CMD SET MYISO=\\multiboot\\ISOs\\%MYISO%\r\n
map --mem (md)0x800+4 (99)
map /multiboot/ISOs/%MYISO% (0xff)
map (hd0) (hd1)
map (hd1) (hd0)
map --hook
write (99) [FiraDisk]\nStartOptions=cdrom,vmem=find:/multiboot/ISOs/%MYISO%;\n\0
chainloader (0xff)/BOOTMGR || chainloader (0xff)
– For Windows 8/8.1 x86, we create ‘windows8x86.lst‘:
debug off
set MYISO=win8_x86.iso
dd if=()/firadisk/auWin8.xml of=()/AutoUnattend.xml
dd if=()/firadisk/spaces.txt of=()/firadisk/ISONAME.CMD
write ()/firadisk/ISONAME.CMD SET MYISO=\\multiboot\\ISOs\\%MYISO%\r\n
map --mem (md)0x800+4 (99)
map /multiboot/ISOs/%MYISO% (0xff)
map (hd0) (hd1)
map (hd1) (hd0)
map --hook
write (99) [FiraDisk]\nStartOptions=cdrom,vmem=find:/multiboot/ISOs/%MYISO%;\n\0
chainloader (0xff)/BOOTMGR || chainloader (0xff)
Similarly you could create another file for the x64 version: ‘windows8x64.lst‘. This way also allows you to install Windows10 versions (!!!).
Note: For these examples, the names of the ISO images of Windows XP, Windows 7 and Windows 8 would be WINXP_X86.ISO, WIN7_X86–X64.ISO and win8_x86.ISO, respectively.
● Adding ‘FiraDisk’ drivers. Download the file containing the FiraDisk drivers from HERE (own version adapted to this procedure) and unzip it into the root of the pendrive. The file ‘AutoUnattend.xml’ and the ‘FiraDisk‘ folder with all its contents are added to the root.
If you have done everything correctly you should have all Windows OSs ready for booting from a pendrive. 😉
Furthermore, you can still go on adding other bootable distributions from YUMI.
Note: Windows 7 gives problems with USB 3.0 ports (not with the USB 3.0 flash drives), so you must boot from a 2.0 port to avoid mistakes.
DOWNLOADS:
I leave HERE some sample files as they should be and other necessary files for downloading.
WEB REFERENCES:
| http://reboot.pro/topic/17455-yumi-boot-windows-7-iso/ |
| http://techsoncall.wordpress.com/2013/02/21/how-to-create-a-multi-windows-usb-drive/ |
| http://foro.elhacker.net/windows/crear_multiboot_con_win7_8-t391280.0.html |
| http://www.nostalgiastrike.com/foro/index.php?topic=7209.0;wap2 |
| http://www.rmprepusb.com/tutorials/firawiniso |